I think my mail-woman needs to take up yoga. Everyday I know the mail has arrived when I hear her zoom past. It's kind of like on Funny Farm, but in the suburbs. Even my packages she seems to throw at the house. I can just hope that one day she becomes less anxious, slows her breath, becomes less reactive, and slows down a little bit altogether. Slow down mail-lady. Slow Down.
In the meantime, I'll just have to accept that my packages arrive like they've been drop kicked at the door to save time.
Readers via Email - Click Here for the Video
Wednesday, August 31, 2011
Tuesday, August 30, 2011

Monday, August 29, 2011


Thursday, August 25, 2011
Chakra Meditation
Photo Source: Coffee and Yoga
 |
| If you want to do this meditation - start with the Red one and follow the line of mantras around to the purple one. |
Photo Source: Coffee and Yoga
Wednesday, August 24, 2011
Must Read Yoga Books
I've finally started settling into my new schedule with yoga and cooking and eating and going to the gym and all that. I'm getting comfortable in it, so instead of feeling rushed I feel quiet. Downtime has almost magically presented itself to me and I'm spending more time sitting around looking at the grass, watching TV online, and generally wanting to read books.
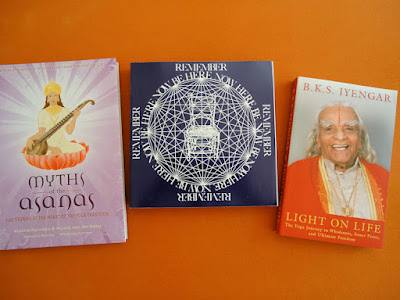
I'm not much of a reader, but I've been craving books lately. Since I don't usually read - I don't keep a lot of books around (that are mine - adam collects them) so I had to order some books last week. They finally arrived and I'm psyched. Can't wait to dig in and spend some lazy afternoons soaking them in.

I'm not much of a reader, but I've been craving books lately. Since I don't usually read - I don't keep a lot of books around (that are mine - adam collects them) so I had to order some books last week. They finally arrived and I'm psyched. Can't wait to dig in and spend some lazy afternoons soaking them in.
Tuesday, August 23, 2011
Hemalayaa Inspires
This photo from the new Yoga Journal is exploding with thrilling joyous inspiration. I want it on my desktop, my phone, and every wall.
For more Hemalayaa - check out her website.
 |
| From the Sept. 2011 Yoga Journal article on Kirtan. |
Monday, August 22, 2011
Meditation - Success!
Remember ages ago I was talking about trying to build a regular daily meditation practice? I had arbitrarily set the goal to every day for six months. I figured if I'd made it 6 months it was a real habit and I was serious about it.
I just realized today that a couple weeks ago I hit my 6 months of meditation. Yay!
It's definitely a habit now. I meditate every day rain, shine, or apocalypse. Sometimes it's 30 minutes, sometimes it's 5... on a rare occasion it's like 2 which hardly feels like meditation but it counts.
I just realized today that a couple weeks ago I hit my 6 months of meditation. Yay!

It's definitely a habit now. I meditate every day rain, shine, or apocalypse. Sometimes it's 30 minutes, sometimes it's 5... on a rare occasion it's like 2 which hardly feels like meditation but it counts.
Friday, August 19, 2011
Don't Be That Guy - (Video)
Here's a little video that covers more of the yoga population than I care to admit. Let's NOT be that guy. Ever. No one likes that guy. No one.
Some of the language may be NSFW. Depends on where you work.
Readers via Email - Click Here for the Video.
Some of the language may be NSFW. Depends on where you work.
Thursday, August 18, 2011
Baby Steps to Forearm Stands
Forearm stands are super intimidating things. They really are. I'll guarantee that 99% of you looking at this post THINK you can't do them. Couldn't do them in a million years. Well you're wrong. For me personally - they're easier than handstands... and anyone can do a handstand.
I post pics of forearm stands (aka Pincha Mayurasana) every now and then. They're on my flickr, they're on my blog, they're on my bodyspace, they're just everywhere. I love them and I do them everyday. I used to think that I'd never be able to do them. Look at me now. Doesn't my doubtful past self feel sheepish? People sometimes ask me how to do them. So I teach them. I've been teaching forearm stands and getting people into their FIRST forearm stand since before I could do them myself. Today I'm going to break it down for you. Soak it in, practice it, and experience the revelation that is a forearm stand.
I always warm up with sun salutations before I do forearm stands.. I do this because I need the sun salutations to open my hips, hamstrings, and shoulders. I need them to wake up my feet, fingers, and core. Make sure that you're warmed up before you do any of these poses. If you don't - you may hurt yourself and that will suck.
 |
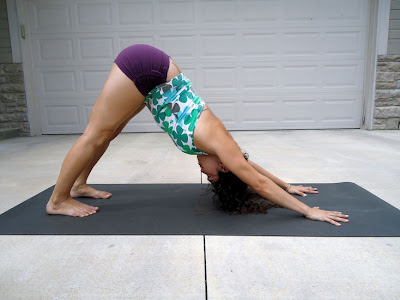
| Start in Downdog. Press your chest toward your feet to open your shoulders a little more. |
 |
| From downdog, keep your feet and hands in place, but lower your forearms onto the floor. Make sure your forearm makes a straight line behind your wrist to your elbow parallel to the sides of your mat. Raise your hips up - just like downdog. Claw your fingers into the floor and walk your feet in towards your hands - as close as you can take it. Hold here and breathe. If this is as far as you can go for a while - just practice this. |
 |
| Once you can hold the previous pose for a bit - take one leg straight up. Think of making a straight line from elbows to toes. This will prepare you for kicking up later. Also - it brings more weight into your upper body. Lower the leg after a few breaths and switch sides. If you need it - take childs pose in between sides to give your shoulders a rest. Get comfortable with these poses before you start practicing at the wall. |
 |
| Once you're ready to start kicking up - grab a block and move to the wall. This is how you'll hold it. You want your fingers right up against the wall but don't smash them. |
 |
| Set up just like before... forearms on the floor and parallel - lengthen your side body. Melt your heart down while you puff up the back of your kidneys a bit. Press into that forearm version of downdog - while holding the block as shown above. Press your wrists into the floor and draw your elbows energetically towards each other. They should feel active, but not move. |
 |
| Remember the one leg up? Do that... then lightly bend your bottom knee and "hop" up. Keep it soft. Don't throw yourself around like you don't matter. Bring your heels to the wall and draw your legs together. Press your heels UP toward the ceiling - HARD. Press your wrists/forearms into the floor as if pushing the floor away from you. Tuck your tailbone away from the wall and look straight ahead, not down. Hold, Breathe. Come down after a few breaths and kick up with the other leg. |
 |
| Once you get up - remember you're balancing over your shoulders not your hands. Eventually you'll find the sweet spot and your feet will kinda find their own way off of the wall. (this might happen over months of practice) Keep your feet active, legs together, and tailbone super tucked. |
 |
| Eventually you'll be ready to ditch the block. You'll know you're ready when you try it without the block and your hands don't drag themselves together when you press up into downdog/forearm stand. Without the block - this is what setup looks like. Fingertips are maybe an inch away from the wall, palms flat like downdog. You want your hands shoulder distance apart - mine might be a little too close here. Otherwise everything else is exactly the same as before. |
 |
| Without the block you have to claw your fingers into the floor instead of the block. |
 |
| Once you're comfortable at the wall for a while you can gradually start adding distance between you and the wall until you're just out in the middle of the room. You'll probably fall all the way over a million times if you don't use a spotter. Grab a friend if you're not a good faller. I still fall all the time. In this pic I need to tuck my tailbone more and puff my kidneys a bit more to get my feet more above my shoulders a bit. Just so you know. |
Now that you know all about how to do it. Practice Practice Practice. Practice in your kitchen, practice in your garage, practice at the gym, practice on the playground, practice against a tree, and practice with a Friend!
In general, this sequence is for anyone, but please don't try this sequence without speaking to your Dr. first if you have any medical/physical problems. Seek Peace At Your Own Risk!
You May Also Enjoy:
Wednesday, August 17, 2011

Tuesday, August 16, 2011
My Home Practice - What it Looks Like
I've mentioned that I'm really into my yoga, and I do a lot of it... often. I do my morning yoga routine in about an hour just to get me ready for the day. Then later I do my real practice. My full practice. I'm sure you've heard me mention these terms. It's not to say that my morning practice isn't important, but it's not the one where I really dig deep. It's not the one where I stop answering phones and just get into the zone for the afternoon.
The big practice I do each day can take anywhere from 1 - 3 hours. It usually ends up being right around 3 hours because that's just what I'm comfortable doing. I have a lot of things I intend to do and it takes a while to fit them in. Just this morning Adam was saying how I will sometimes sit down intending to stretch for a couple minutes, but then I keep adding one more thing and one more thing until I've accidentally done a full practice and 3 hours have passed. Yes, sometimes it happens that way... but I also have a notebook full of pre-planned sequences I really like to do. Someone asked me last week about my practice - what it looked like, how many asanas I did... soo...
Here's a sequence I wrote - a year or two ago. It's kinda old now. I wrote this sequence purely for Anjaneyasana with mermaid arms. I wanted to nail that pose, so I built a sequence that would get me there. Since then I've added a lot of things and I often ad lib a bunch of stuff as I go that doesn't get written down too. In fact, now this sequence has been altered to get me to Eka Pada Raja Kapotasana 2. This particular sequence takes me 2 - 2.5 hours, so it's pretty standard for me. Not the longest or shortest practice I do... just average.
As you can see, my personal sequences are kinda involved and full of pictures, abbrevations, names or descriptions that are nowhere near official (it just helps me know what I'm talking about), and little symbols that denote flows or repeated things. Most of these poses I do 2 - 5 times each and the Sun Salutations at the top (looks like SS) I do 2 - 4 of depending on the day.
I'm not suggesting this sequence to anyone - it's all sorts of personalized for me and me alone. This is just an example. A little peek into what it is I do in my personal practice.
The big practice I do each day can take anywhere from 1 - 3 hours. It usually ends up being right around 3 hours because that's just what I'm comfortable doing. I have a lot of things I intend to do and it takes a while to fit them in. Just this morning Adam was saying how I will sometimes sit down intending to stretch for a couple minutes, but then I keep adding one more thing and one more thing until I've accidentally done a full practice and 3 hours have passed. Yes, sometimes it happens that way... but I also have a notebook full of pre-planned sequences I really like to do. Someone asked me last week about my practice - what it looked like, how many asanas I did... soo...
Here's a sequence I wrote - a year or two ago. It's kinda old now. I wrote this sequence purely for Anjaneyasana with mermaid arms. I wanted to nail that pose, so I built a sequence that would get me there. Since then I've added a lot of things and I often ad lib a bunch of stuff as I go that doesn't get written down too. In fact, now this sequence has been altered to get me to Eka Pada Raja Kapotasana 2. This particular sequence takes me 2 - 2.5 hours, so it's pretty standard for me. Not the longest or shortest practice I do... just average.
 |
| This isn't for you - don't do this. |
As you can see, my personal sequences are kinda involved and full of pictures, abbrevations, names or descriptions that are nowhere near official (it just helps me know what I'm talking about), and little symbols that denote flows or repeated things. Most of these poses I do 2 - 5 times each and the Sun Salutations at the top (looks like SS) I do 2 - 4 of depending on the day.
I'm not suggesting this sequence to anyone - it's all sorts of personalized for me and me alone. This is just an example. A little peek into what it is I do in my personal practice.
Monday, August 15, 2011
Support the Arts - Become a Backer
HeartsExpanding reader and independent filmmaker Daniel McGuire is making a documentary on Traditional Healers of Bali. I think that's pretty cool. Maybe you like documentaries, traditional healing, you read the book Eat Pray Love, or you like to support the arts. If you're any of these people, then you are very well the kind of person Daniel is looking for.

He has spent 15 years studying and documenting Balinese traditional healers. "McGuire shot a short piece on healers that aired on the Discovery Channel in 1998. But he returned to Bali regularly, and touched base with the healers he met in 1996, shooting follow-up material." One of them you may have already heard of, Ketut Liyer from Eat Pray Love, but they are all worthy of your attention.
A little bit about the healers:
"While Ketut Liyer is now the most well-known healer in Bali, he is upstaged in the film by a healer named Mangku Made Pogog. 'Pogog is one of the most amazing people I’ve ever met.' McGuire notes. 'He has a kind of energy and charisma that is really mindboggling. The only person I’ve ever seen who came close is Iggy Pop - though that’s probably a weird analogy! Check out the trailer on Kickstarter if you don’t believe me.' Another healer in the film is Mangku Alit, a healer who falls into trance and is possessed by a spirit who dispenses advice to patients. 'She’s a force of nature, and very grounded in her community. She operates in a different realm than the rest of us…'"

Daniel says of Pogog: "The question in my mind, when I first saw him, was "where does this style come from?" Did he invent it? Was it part of a family or older tradition? Could it date back even further - to the time when India colonized the Indonesian islands? I'm still looking for answers to some of these questions."
If any of you have some insight into these topics - Please share.
You can view a trailer for Daniel's film by visiting the Kickstarter Link Below. It was supposed to be embedded here, but for some reason it's not working.
Here's Where You Come In:
Daniel McGuire has a Kickstarter Campaign (and a trailer for the film) to build funding of at least $15,000 for the production costs of this film by September 5th. Act fast so you can become an integral part of this film's creation by donating as little as $1. If you want to become a backer for this film - head on over to the Kickstarter campaign page to pledge your donation. On that page you will find more information on How it works, Where the money goes, and What you'll receive in exchange for your generous donation. Your pledge will only be deducted from your bank account/credit card IF the goal amount is reached or exceeded by September 5th.
You can also find Daniel McGuire and his project on
Twitter
Facebook
and
BaliHealer{dot}com

He has spent 15 years studying and documenting Balinese traditional healers. "McGuire shot a short piece on healers that aired on the Discovery Channel in 1998. But he returned to Bali regularly, and touched base with the healers he met in 1996, shooting follow-up material." One of them you may have already heard of, Ketut Liyer from Eat Pray Love, but they are all worthy of your attention.
A little bit about the healers:
"While Ketut Liyer is now the most well-known healer in Bali, he is upstaged in the film by a healer named Mangku Made Pogog. 'Pogog is one of the most amazing people I’ve ever met.' McGuire notes. 'He has a kind of energy and charisma that is really mindboggling. The only person I’ve ever seen who came close is Iggy Pop - though that’s probably a weird analogy! Check out the trailer on Kickstarter if you don’t believe me.' Another healer in the film is Mangku Alit, a healer who falls into trance and is possessed by a spirit who dispenses advice to patients. 'She’s a force of nature, and very grounded in her community. She operates in a different realm than the rest of us…'"

Daniel says of Pogog: "The question in my mind, when I first saw him, was "where does this style come from?" Did he invent it? Was it part of a family or older tradition? Could it date back even further - to the time when India colonized the Indonesian islands? I'm still looking for answers to some of these questions."
If any of you have some insight into these topics - Please share.
You can view a trailer for Daniel's film by visiting the Kickstarter Link Below. It was supposed to be embedded here, but for some reason it's not working.
Here's Where You Come In:
Daniel McGuire has a Kickstarter Campaign (and a trailer for the film) to build funding of at least $15,000 for the production costs of this film by September 5th. Act fast so you can become an integral part of this film's creation by donating as little as $1. If you want to become a backer for this film - head on over to the Kickstarter campaign page to pledge your donation. On that page you will find more information on How it works, Where the money goes, and What you'll receive in exchange for your generous donation. Your pledge will only be deducted from your bank account/credit card IF the goal amount is reached or exceeded by September 5th.

You can also find Daniel McGuire and his project on
and
BaliHealer{dot}com
Friday, August 12, 2011
Bay Shakti Noah Maze Interviews - (Video)
Here's a couple videos I found this week via Bay Shakti that I really wanted to share with you. It's a 2 part interview with Noah Maze at this year's Wanderlust. The videos are about 10 minutes each and completely worth the time it takes to watch them. Everything Noah says resonates with me and my views on practice.
Readers via Email - Click Here for the Videos
Thursday, August 11, 2011

Wednesday, August 10, 2011
So Your Forward Bends Suck
Usually when people ask me about forward bends, I tell them to be patient. I tell them to practice their forward bends and to implement the tips they get from their teacher. Not everyone has a teacher that they trust. Therefore, today I'm going to give you a round-about somewhat kind of plan. Do you want to get past the modifications for your forward bends sooner than later? Do you want to effortlessly flop forward into a magnificent toe-touching extravaganza? Then do hip openers. I've written about hip openers before, and I suggest you check it out because that old stuff will come up.
I'm going to suggest a short sweet routine of only 6 poses (in 8 pics) you can do every day. This is not an all inclusive list/sequence - if you know of some hip openers you really like - throw them in. If you're in a hurry you can do these poses in a tiny window of time each morning or evening... maybe during your break at work. Longer holds are better, but doing something is always better than doing nothing. Also - try sitting on the floor more often. Chairs are bad for you.
Finish with a 5-10 minute Savasana.
If you try this sequence - let me know if you like it. Let me know if you have questions. I'm always around. Namaste.
In general, this sequence is for anyone, but please don't try this sequence without speaking to your Dr. first if you have any medical/physical problems. Seek Peace At Your Own Risk!
If you're reading this post there's a good chance you want to read these too:
Standing Forward Bends for Unflexible Bodies
Seated Forward Bends for People That Don't Bend That Way
Touch Your Toes - Eventually
I'm going to suggest a short sweet routine of only 6 poses (in 8 pics) you can do every day. This is not an all inclusive list/sequence - if you know of some hip openers you really like - throw them in. If you're in a hurry you can do these poses in a tiny window of time each morning or evening... maybe during your break at work. Longer holds are better, but doing something is always better than doing nothing. Also - try sitting on the floor more often. Chairs are bad for you.
 |
| Wide Legged Forward Bend. Take your legs as wide as is comfortable. Mine is pretty wide - maybe too wide. Keep your toes flexed and pointing up. Spine LONG, groins open, and tailbone tucked downward. If you're comfortable upright - try folding forward. Keep all those things I just listed and breathe. If your toes start to point more forward than up - you've gone too far. Come out of it a bit until you can keep them up. |
 |
| Janu Sirsasana. From your wide legged seated stance, bend one knee and bring that heel to the same side thigh/groin crease. Flex your toes - no lazy feet! Turn to face your straight leg. Hold the outside edge of the foot with the opposite hand. Spine long, legs active, fold forward - toward your shin. If you can't reach the foot - hold the leg, grab a strap, or simply place your hands on each side of your straight leg. Carefully return to center and repeat on the other side. PS: my other hand is next to my hip, on fingertips - elbow elevated and shoulder back to keep my side body long. |
 |
| Cobbler. Soles of your feet together - as close to your groins as is comfortable. Don't worry about it if your knees are far away from the floor. Let the front of your groins open and the tailbone tuck. Flex your feet and keep the soles together. I know some styles teach feet open like a book - I don't. Let gravity push your knees down - don't assist it. Spine long. If you're comfy upright - try folding forward. |
 |
| Cowface Pose - only the lower body part. Sit here with knees approximately stacked best you can. Spine long... don't allow your back to round too much. Be careful with your knees when moving into or out of this pose. Hold for a while then repeat on the other side. |
 |
| Garland variation. Feet about shoulder distance apart and pointing forward as much as possible. If you can't get your heels to the ground and be comfortable then roll up a mat or stack some blankets under your heels. Press your thighs into your triceps (back of your upper arm) and your triceps into the thighs/knee area. Really pressing your palms together strongly will help. Keep your spine long and breathe. |
 |
| Pigeon - I love pigeon pose. Obviously. Notice my front knee is inside that same side hand. This type of setup is ideal if you have sensitive knees. Bring your front toes closer to your opposite hip the more your body resists this pose. Eventually your front shin will be parallel to the front of your mat, but start small. Back toes tucked under to assist in pushing that side's hip forward while pulling the bent knee's hip back. This is drawing them towards square. |
 |
| Keep your front foot flexed. This more forward your foot is - the more important this becomes to protect the knee. Stay up on your fingertips to avoid getting SOGGY in the pose. Spine long, tailbone tucked, shoulders back to support the heart pressing forward. |
 |
| Fold forward to work a different aspect of the hips. This may make you want to punch someone in the face. You've been warned. Spine long, keep drawing the hips toward square, palms up or down based on preference. Palms down is quieting, Palms up makes the pose (and any bad feelings about it) an offering. Carefully press back to downward facing dog for a few moments before repeating on the other side. |
Finish with a 5-10 minute Savasana.
If you try this sequence - let me know if you like it. Let me know if you have questions. I'm always around. Namaste.
In general, this sequence is for anyone, but please don't try this sequence without speaking to your Dr. first if you have any medical/physical problems. Seek Peace At Your Own Risk!
If you're reading this post there's a good chance you want to read these too:
Standing Forward Bends for Unflexible Bodies
Seated Forward Bends for People That Don't Bend That Way
Touch Your Toes - Eventually
Tuesday, August 9, 2011
Seated Forward Bends for People That Don't Bend That Way
Yesterday I posted on Standing Forward Bends... and today I'll be covering the seated versions of those same things. It's basically the same pose, but because you're seated the modifications are a little bit different. Just like the other post - the first step is to keep your feet hip distance apart.
If you're reading this post there's a good chance you want to read these too:
Standing Forward Bends for Unflexible Bodies
So Your Forward Bends Suck
Touch Your Toes - Eventually
 |
| Hip Distance = See Previous Post for too much talk on this. |
 |
| If the very act of sitting upright is not possible (or is painful) then grab a strap. This is totally effective. Notice my arms, legs, and feet are very active. No lazy stretches will improve your hamstrings/low back. Keep your shoulders back and belly firm too. |
 |
| Once you are comfortable at a 90degree angle - shorten your strap a lot and keep up the same active work. Note: Shoulders are still back but arms are straight since you don't have to counter as much torso pull. |
 |
| This also works with bent knees if your lower back is sensitive. However, make sure that you really press away from your heels with your BUTT. If you don't - then the bent knees negates any helpful stretching you might have gotten. If you don't press back through your butt - you might as well just lay down... its just as useless. All the pieces are still active. |
 |
| You can totally do this at a wall to help you root through your feet. Stretches your hamstrings, and is perfectly fine if that's where your comfort level is. If you feel a stretch - it's good. Press through your hands, butt, and feet. Keep your legs strong and toes flexed. Lengthen your back without using your back muscles. |
 |
| Great modification if your low back is sensitive and you don't have a strap. Legs active, shoulders back, low belly tucked. Ignore that block - it just happens to be there. See my note above about the active butt. |
Have questions about these modifications? Did I not address your issue at all? Did this post only confuse you? Send me your questions and I'll always do my best to answer them.
Tomorrow: Hip Openers to help you on your journey towards comfortable happy forward bends.
In general, this sequence is for anyone, but please don't try this sequence without speaking to your Dr. first if you have any medical/physical problems. Seek Peace At Your Own Risk!
If you're reading this post there's a good chance you want to read these too:
Standing Forward Bends for Unflexible Bodies
So Your Forward Bends Suck
Touch Your Toes - Eventually
Monday, August 8, 2011
Standing Forward Bends for Unflexible Bodies
Forward Bends are Hard. I've posted about them before. Mostly how they take patience and you're not a total lame-O if you can't touch your toes. You're not alone. In fact, so many people have problems with forward bends that there are about a bajillion modifications available to make them do-able for each and every one of you.
Today I'm going to go over some tips and modifications for Standing Forward Bends. Feel free to practice these in your spare time, and/or add them into your usual yoga class. Your teacher won't mind - and if they do I think they're kind of a meanie and you should find someone else.
In case I forgot to mention it... Spread your Toes!! Tomorrow we'll cover Seated Forward Bends. Yay!
Have questions about these modifications? Did I not address your issue at all? Did this post only confuse you? Send me your questions and I'll always do my best to answer them.
If you're reading this post there's a good chance you want to read these too:
Seated Forward Bends for People That Don't Bend That Way
So Your Forward Bends Suck
Touch Your Toes - Eventually
Today I'm going to go over some tips and modifications for Standing Forward Bends. Feel free to practice these in your spare time, and/or add them into your usual yoga class. Your teacher won't mind - and if they do I think they're kind of a meanie and you should find someone else.
 |
| For troubled benders, hip distance apart is a MUST. It allows the pelvic floor more space which believe it or not feels so much better. Hip Distance = Hip BONE Distance. This is about 2 loose fists apart. Don't cram them together, that's not nice. Mine is actually 2 fists and maybe an inch. Don't be a nazi about it. It's not EXACT. Bonus: Hip distance apart allows more room if you have some belly which is way more comfortable. |
 |
| Hands just above knees is fine. Bend your knees a bit, but keep your spine long, core powered, and legs active. You can see that my muscles are working. Most importantly - if your knees are bent - stick your butt out! If you don't - then bending the knees removes all stretch from the hamstrings. Poke out your butt to activate the hams and you'll see progress. |
 |
| Blocks! Super useful... pic shown is for backs that are ok with straight legs, but hamstrings that won't let you reach the ground. Long straight spine, tuck your lower belly in. |
 |
| Block for the hamstrings, fingertips are better than flat hands 'cause they support better shoulder alignment. Bent knees for iffy backs - poke out your butt... long straight spine, tucked belly. |
 |
| When you're almost to the floor... hands on shins is good. Just don't press into your shins a lot or you'll hyperextend a knee and it will take an eternity to heal. |
 |
| Just like before, but with a lower block. The ground is so close you can taste it. Eww. |
 |
| Yay - Reaching the floor! but nothing fancy. Can't fold your torso down yet? That's ok... just keep it long and practice this... you'll get there. |
 |
| If you can reach the floor, but your lower back is sore, or maybe you're not quite warmed up enough for your best forward bend... Bend your knees AND touch the floor. I do this often. It's luxurious. Don't forget about your butt. When in doubt, stick it out. |
In case I forgot to mention it... Spread your Toes!! Tomorrow we'll cover Seated Forward Bends. Yay!
Have questions about these modifications? Did I not address your issue at all? Did this post only confuse you? Send me your questions and I'll always do my best to answer them.
In general, this sequence is for anyone, but please don't try this sequence without speaking to your Dr. first if you have any medical/physical problems. Seek Peace At Your Own Risk!
If you're reading this post there's a good chance you want to read these too:
Seated Forward Bends for People That Don't Bend That Way
So Your Forward Bends Suck
Touch Your Toes - Eventually
Friday, August 5, 2011
Health Fair Results
My blog may be about yoga... but ultimately it's all about Health in general too. Wednesday Adam and I went to a health fair. We wandered around and got free pens, tiny tooth shaped floss, and got fun little measurements like cholesterol levels, body fat, blood pressure, etc. It was an interesting experience. Here's how my numbers turned out:
 Weight: 113.6 pounds
Not terrible, but a little high. Remember that I'm small, so my ideal body weight is close to 100.
BMI: 24.1
On the upper end of Normal.
Bodyfat: 34.9%
Ick. This is a bad number. I've always mentioned that I need to get my nutrition in check and here's proof. This officially classifies me as "overweight" which I already knew, but geeze.
Skeletal Muscle: 27.6%
This is dead center of Normal. I have a supremely OK amount of muscle on me.
Resting Metabolism: 1128
This is the number of calories I would burn each day if I did absolutely nothing but lie there. It's a good base number to know if you want to count calories.
Body Age: 42
How I ended up with a body age of 42 is beyond me. My bodyfat is really the only bad thing on there. So yeah - my actual age is 29, but my body is 42... supposedly...somehow.
Visceral Fat Level: 5
Again, pretty much dead center of normal. This is the amount of fat I have in my guts.
Blood Pressure: 110 over 70
Normal and Peachy
So overall I'm healthy as usual, but my bodyfat is aging me and making me gross. Boo. I've actually been trying to work on this a bit, and you can check out My Bodyspace page to keep up with it if you want to. There's a link to that page that lives at the top of my blog, so stop by anytime.
Wednesday, August 3, 2011
Forward Bends for Flexible People
Today's post is for intermediate/advanced students that are comfortable in their back, shoulders, and hamstrings. This post is not for the timid. I'm not going all contortionist on you - I can't do most of the craziest forward bends, but I know some modifications if basic forward bends are getting boring for you.
I wouldn't suggest doing the last couple very often. In fact, maybe just don't do them at all. I generally don't. It's just a little something I know I can do. If you're more comfortable in your forward bends than I am - maybe do them once a week.
Have questions about these modifications? Did this post only confuse you? Send me your questions and I'll always do my best to answer them.
This sequence is NOT for just anyone. Don't try this sequence without speaking to your Dr. first if you have any medical/physical problems and/or do not already have a comfortable capable intermediate level yoga practice. Seek Peace At Your Own Risk!
 |
| Warm Up First. |
 |
| Yep, that's a forward bend. |
 |
| Elbows out to the side, side body long, shoulders back. Clasped hands or holding a wrist around the feet are further options. |
 |
| One 4 inch cork block. |
 |
| Two 4 inch thick cork blocks. Don't hurt yourself. |
I wouldn't suggest doing the last couple very often. In fact, maybe just don't do them at all. I generally don't. It's just a little something I know I can do. If you're more comfortable in your forward bends than I am - maybe do them once a week.
Have questions about these modifications? Did this post only confuse you? Send me your questions and I'll always do my best to answer them.
Subscribe to:
Posts (Atom)